There’s a reason the rocket ship is one of the first things kids reach for when they pick up a pencil. It’s bold, exciting, and captures the thrill of blasting off into the unknown.
If inspired by a favorite space movie, a school science unit, or pure imagination, learning how to draw a rocket ship is a fun project for young artists.
The good news is that you don’t need special artistic talent to draw a great-looking rocket. Once you break it down into a few simple shapes a cylinder, triangle, circles, and fins almost anyone can create a rocket that looks ready for liftoff.
In this guide, we’ll show you how to draw a rocket ship step by step, from the first pencil line to the final splash of color.
If you’re a parent helping a young child, a teacher planning a classroom activity, or a beginner practicing on your own, you’ll have a finished rocket ready to launch in no time.
🚀 Key Takeaway: You don’t need advanced drawing skills. Start with simple shapes, build the rocket one part at a time, and let creativity take over.
Why Drawing Rockets Is Great for Kids
Beyond being a fun subject to draw, rockets offer real developmental benefits that make this activity more than just a few minutes of quiet time.
✏️ It Builds Fine Motor Skills
Every line, curve, and shape a child draws helps strengthen the small muscles in their hands and fingers. These skills are useful for handwriting, cutting with scissors, coloring, and other everyday activities.
Guiding a pencil around a rocket’s curved body or angled fins is a natural, low-pressure way to practice pencil control.
🔺 It Introduces Basic Shapes and Spatial Reasoning
Breaking a rocket down into a cylinder, triangle, and circles teaches kids to see complex objects as combinations of simpler shapes.
This is a foundational skill that connects naturally to both art and early math.
🚀 It Sparks Interest in Space and STEM
A rocket drawing can lead to bigger questions:
- How do real rockets fly?
- What’s out in space?
- Why do rockets need engines?
- What keeps a rocket stable?
- How do astronauts get into space?
These questions can naturally lead into science, engineering, astronomy, and space exploration.
🎨 It Encourages Creativity and Self-Expression
There’s no single “correct” way to draw a rocket. Kids can choose their own colors, add details, and design a spacecraft that reflects their personality.
It could be a sleek silver explorer, a colorful cartoon rocket, or a completely imaginary spaceship.
💡 Parent Tip: Focus on creativity rather than perfection. Let children make design choices themselves to build confidence and encourage self-expression.
Materials Needed
One of the best things about this rocket drawing activity for kids is that it requires almost no special equipment.
Basic Drawing Supplies
- Paper: Plain printer paper works perfectly. Grid or dot paper can also help with straight lines and symmetry.
- Pencil: A regular No. 2 pencil is ideal for sketching.
- Eraser: Useful for removing guidelines and correcting shapes.
- Fine-tip pen or marker: Great for outlining the final rocket.
Coloring Supplies
- Crayons, markers, or colored pencils: Choose whichever supplies you already have.
- Metallic or silver markers: Optional, but useful for creating a realistic-looking spacecraft.
Optional Tools
- Ruler: Helpful for straight lines and symmetry.
- Compass or round object: A coin or cup can help create a neat circular window.
- Reference photos: Real rocket images can help older children create more realistic designs.
You don’t need fancy art supplies. A pencil, paper, and a few crayons are enough to get started.
🎨 Quick Tip: Don’t delay the activity because you don’t have special supplies. Simple materials are more than enough for a great rocket drawing.
Basic Shapes to Draw a Rocket
Before jumping into the full step-by-step drawing, it helps to understand that most rocket illustrations are combinations of a few simple shapes.
The Body: Oval, Rectangle, or Cylinder
The body forms the main structure of the rocket.
Think of it as a tall, narrow shape with rounded or straight sides, similar to a tube or can.
The Nose Cone: Triangle or Curved Point
The nose cone sits at the top of the rocket and gives it its recognizable pointed shape.
For a cartoon rocket, you can use a simple triangle. For a softer design, try a curved cone.
The Fins: Small Triangles
Fins are usually placed around the lower part of a rocket.
For a drawing, two or three triangular fins can give the rocket a balanced and recognizable appearance.
The Window: Circle or Oval
A circular or oval window adds personality to the rocket.
Kids can even draw an astronaut inside for an extra fun detail.
The Exhaust: Wavy or Jagged Shapes
At the bottom, use wavy or jagged shapes to represent flames and exhaust.
This is one of the most fun areas to color because kids can experiment with yellow, orange, and red.
A Quick Shape Warm-Up
Before drawing the entire rocket, have kids practice these shapes separately:
- Circles
- Ovals
- Triangles
- Straight lines
- Curved lines
✏️ Drawing Tip: Practicing individual shapes for a few minutes can make the final rocket much easier to draw.
How to Draw a Rocket Ship Step by Step
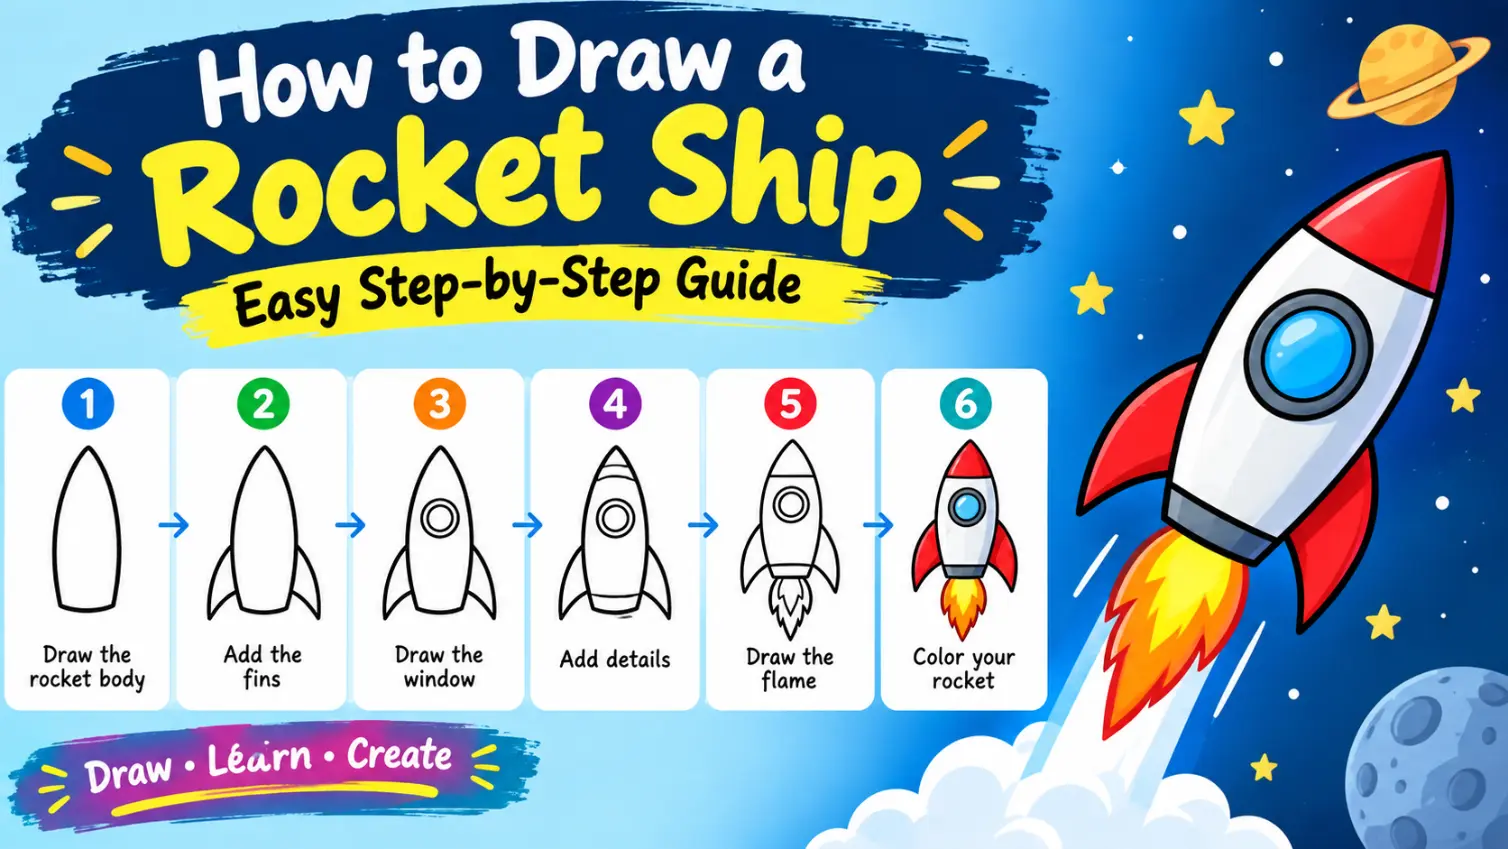
Now it’s time to put the basic shapes together and bring your rocket to life. Follow these steps in order for an easy rocket drawing for beginners.
Step 1: Draw a Center Guideline
Lightly draw a vertical line down the center of your paper.
This line won’t be part of the finished rocket. It simply helps you keep both sides balanced.
Step 2: Draw the Rocket Body
Using the guideline as the center, draw a long vertical oval or rounded rectangle.
This becomes the main body of your rocket.
Don’t worry if both sides aren’t perfectly identical. You can adjust them later.
Step 3: Add the Nose Cone
At the top of the body, draw a triangle or curved cone that comes to a point.
This creates the recognizable nose of the rocket.
Step 4: Draw the Fins
At the lower part of the rocket, sketch two or three triangular fins angled outward.
Keep the fins roughly similar in size, but don’t worry about making them mathematically perfect.
Step 5: Add the Window
Draw a circle or oval in the upper-middle portion of the rocket.
For extra detail, add a smaller circle inside it to represent a reflection on the glass.
You can even draw an astronaut peeking through the window.
Step 6: Draw the Exhaust and Flames
At the bottom of the rocket, add wavy or jagged shapes to represent the exhaust and flames.
Try using different flame shapes to make the rocket look like it’s blasting off.
Step 7: Outline Your Rocket
Once you’re happy with your pencil sketch, trace the final lines using a fine-tip pen or marker.
Then gently erase the visible pencil marks and center guideline.
Step 8: Add Color and Details
Now it’s time to make your rocket unique.
Try adding:
- Stripes
- Stars
- A flag
- Number or mission markings
- Metallic details
- Extra windows
- Colorful flames
🚀 Drawing Tip: Don’t erase every imperfect line. Small differences make a child’s drawing feel original and personal.
Fun Rocket Drawing Styles
Once you’ve mastered the basic rocket shape, try changing the style to create a completely different design.
🎨 Simple Cartoon Rocket
This style is perfect for young children.
Use:
- Rounded shapes
- Bright colors
- Simple fins
- A large window
- Friendly details
Cartoon rockets are especially forgiving of imperfect lines.
🛰️ Realistic Rocket
Older kids and experienced artists can add more detail.
Try including:
- Panel lines
- Multiple engine sections
- Shading
- More accurate proportions
- Metallic surfaces
- Realistic rocket references
Images of historical and modern spacecraft can help with proportions and details.
👽 Sci-Fi or Fantasy Rocket
This is where imagination can take over.
Add:
- Extra fins
- Antennas
- Unusual windows
- Multiple engines
- Strange shapes
- Futuristic details
There doesn’t have to be any real-world engineering logic. The goal is creativity.
🌟 Retro Rocket
Create a classic space-age look with:
- Rounded noses
- Large fins
- Simple body shapes
- Bold colors
- Silver or metallic details
🔥 Rocket Launching Scene
Instead of drawing the rocket by itself, add:
- Smoke clouds
- A launch platform
- Motion lines
- Clouds
- A sky background
This makes the rocket look like it’s actually taking off.
🌌 Rocket in Space
Turn your drawing into a complete space scene by adding:
- Planets
- Stars
- The Moon
- Asteroids
- Satellites
- An astronaut
💡 Creativity Tip: Ask kids to invent a name for their rocket and decide where it is going. This turns a simple drawing into a small storytelling activity.
Drawing Tips for Beginners
A few simple habits can make a big difference, especially for children and beginner artists.
Start Light With a Pencil
Use light, loose pencil strokes when sketching the basic shapes.
This makes it easier to erase and adjust the drawing before adding the final outline.
Use Symmetry Tricks
Keeping both sides of a rocket even can be difficult when drawing freehand.
Try:
- Drawing a light center guideline
- Folding paper in half to create a reference crease
- Using a ruler for straight lines
- Comparing both sides before outlining
Practice Shapes Separately
If circles, triangles, or ovals are difficult, practice them individually before drawing the rocket.
This builds confidence and pencil control.
Build Details in Layers
Work from general to specific:
Basic shape → refined outline → color → shading → small details
Trying to add everything at once can make drawing feel overwhelming.
Embrace Imperfection
A slightly uneven fin or unusual nose cone isn’t necessarily a mistake.
For young artists, the goal should be confidence, creativity, and enjoyment, rather than perfect proportions.
Fix Common Problems
If the fins look uneven, lightly redraw them using the center guideline as a reference.
If the rocket looks off-center, erase part of the body and realign it before adding more details.
✏️ Beginner Tip: Light sketching is your friend. It’s much easier to correct a faint line than a dark permanent outline.
Age-Specific Rocket Drawing Guidance
Drawing ability varies by age, so the level of support should match the child’s development.
Toddlers and Preschoolers: Ages 2–4
At this stage, the goal is exposure and fun rather than precision.
Try:
- Simple rocket templates
- Tracing activities
- Large shapes
- Chunky crayons
- Adult-guided drawing
- Coloring pre-drawn rockets
Young Kids: Ages 5–8
This is a great age for the basic shape method used in this guide.
Children can usually follow simple step-by-step instructions with some adult help.
Keep the design simple and encourage them to choose their own colors and details.
Older Kids: Ages 9–12
Children in this age group may be ready for:
- More detailed rockets
- Shading
- Better proportions
- Panel lines
- Engine details
- Real rocket references
- Perspective drawing
Teens and Adults
More advanced artists can experiment with:
- Three-dimensional shading
- Perspective
- Angled rocket views
- Photo references
- Digital drawing
- Realistic spacecraft designs
👨👩👧 Parent Tip: Adjust the difficulty instead of expecting every child to produce the same drawing. The best activity level is one that feels challenging but still enjoyable.
Fun Ways to Use Your Finished Rocket Drawing
Once the rocket is finished, there are plenty of creative ways to give the artwork a second life.
Make a Greeting Card or Poster
A finished rocket can become a fun birthday card for a space-loving friend or a colorful poster for a bedroom or classroom.
Turn It Into a Coloring Page
Before coloring the original drawing, make a copy of the outline.
Children can use the copy as a reusable coloring page.
Pair It With a Space Lesson
The drawing fits naturally into a classroom or homeschool lesson about:
- Planets
- Gravity
- Space exploration
- Astronauts
- The Moon
- Rocket science
Build a Solar System Scene
Add planets, stars, the Moon, and other spacecraft around your rocket.
This transforms one rocket drawing into a complete space adventure.
Display It Proudly
Put the finished drawing on the fridge, bedroom wall, classroom board, or school project display.
Displaying children’s artwork can help them feel proud of their creative work.
Create a Rocket Fleet
Have several children draw their own rockets.
Then display all of them together as a colorful space fleet, giving every child a chance to showcase their unique design.
🌟 Display Tip: Ask each child to give their rocket a name, destination, and mission. It adds a fun storytelling element to the artwork.
Educational Rocket Drawing Extensions
A rocket drawing can also become a starting point for conversations about space, science, engineering, and history.
Discuss the Parts of a Real Rocket
Use the drawing as a visual aid to discuss major rocket components.
For example:
- Nose cone: Helps shape the vehicle for aerodynamic performance.
- Propellant tanks: Store the fuel and oxidizer used by many rocket engines.
- Engines: Produce thrust.
- Fins: Can help stabilize certain rocket designs, especially during atmospheric flight.
Not every real rocket has the same design, so children can compare different rockets to see how their parts vary.
Introduce Space Vocabulary
Connect the drawing to simple science terms:
- Thrust: A force produced by an engine that propels a rocket.
- Launch: The process of sending a rocket into flight.
- Orbit: The curved path of an object around another object in space.
- Gravity: A force that attracts objects toward one another.
Explore Rocket History
Younger children might enjoy learning about the Apollo missions and the first Moon landing.
Older children can compare historical rockets with modern launch vehicles and explore how rocket designs have changed over time.
Pair It With a Science Activity
The drawing can be followed by a simple paper-rocket activity or another age-appropriate STEM project.
This gives children a chance to connect their artwork with concepts such as motion, thrust, pressure, and flight.
🔬 STEM Tip: After drawing the rocket, ask children to explain what each part does. Combining art with questions about engineering helps turn the activity into a broader STEM lesson.
Frequently Asked Questions
What’s the Easiest Way to Draw a Rocket for a Young Child?
Start with simple shapes: a long oval or rounded rectangle for the body, a triangle for the nose cone, small triangles for the fins, and a circle for the window.
Keep the lines rounded and simple so young children can easily follow along.
How Do I Make My Rocket Look 3D?
Add shading along one side of the rocket to suggest a light source.
You can also add curved lines to the body to emphasize its rounded shape.
For more advanced artists, drawing the rocket from an angle can create a stronger sense of depth.
What Colors Are Best for a Realistic Rocket?
Silver, gray, and white are common colors in many rocket designs, often combined with other colors for markings and details.
For cartoon rockets, however, almost any color combination can work.
Can I Draw a Rocket Without a Ruler?
Absolutely.
A ruler can make straight lines and symmetry easier, but it isn’t necessary. Cartoon rockets can look great with slightly imperfect, freehand lines.
How Do I Draw a Rocket Launching?
Add smoke or dust beneath the rocket, along with motion lines and a flame trail.
You can also tilt the rocket slightly and add clouds or sky streaks to create a stronger sense of movement.
What’s the Difference Between a Cartoon Rocket and a Realistic Rocket?
Cartoon rockets generally use simplified shapes, rounded edges, and bold colors.
Realistic rocket drawings usually focus more on proportions, shading, technical details, panel lines, and references to actual spacecraft.
🚀 Key Takeaway: Whether the rocket is cartoon-style or realistic, starting with basic shapes makes the drawing process much easier.
Conclusion
Learning how to draw a rocket ship proves that exciting artwork can come from just a few simple shapes. From a first attempt by a young child to a detailed spacecraft created by an older artist, this project can be adapted to different ages and skill levels.
Beyond the finished picture, the process can help develop fine motor skills, creativity, focus, confidence, and curiosity about space and science.
Whether the finished rocket becomes a birthday card, classroom project, bedroom decoration, or part of a complete solar system scene, every drawing gives kids another opportunity to practice and create.
So grab a pencil, draw a few simple shapes, add some flames, and get ready for liftoff! 🚀
🌟 Final Tip: Don’t focus on making the “perfect” rocket. Encourage kids to experiment with shapes, colors, and ideas-that’s where the most enjoyable creativity happens.